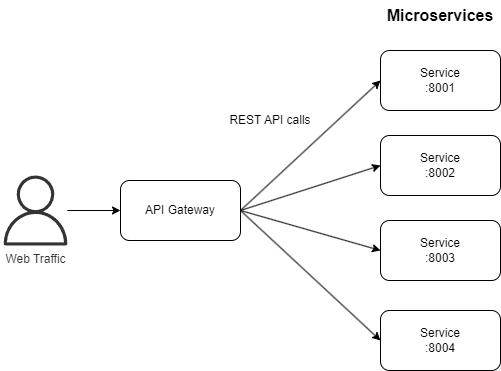
API Gateway란

API Gateway는 클라이언트와 REST API 서비스 사이에 위치하는 소프트웨어 계층으로 모든 API 요청에 대한 통합 진입점 역할을 수행한다. 주요 역할로는 요청 라우팅, 보안, 속도 제한, 로드 밸런싱 등 여러 기능을 제공한다.
API Gateway는 클라이언트와 백엔드 서비스 간의 추상화 계층을 제공하기 때문에 클라이언트가 백엔드 서비스 또는 API의 내부 작동을 알 필요가 없게된다. 이는 클라이언트에 단일 진입점을 제공하고 클라이언트에 영향을 주지 않고 서비스를 추가하거나 수정할 수 있도록 하여 복잡한 마이크로서비스 기반 아키텍처 관리를 단순화 할 수 있게 해준다.
다만 중앙 집중화 방식의 단점으로 API Gateway의 에러가 발생할 경우 전체 서비스에 까지 영향을 미치기 때문에 API Gateway를 여러 대 구동하는 등의 대처를 해놓아야 한다.
API Gateway의 주요 기능
- 인증(Autuentication) & 인가(Authorization)
- 라우팅
- 로드밸런싱
- 로깅(Logging) & 모니터링(Monitoring)
- 입력 유효성 검사
API Gateway는 KrakenD, Amazon API Gateway, Kong, Zuul API Gateway, Spring Cloud Gateway, Nginx Plus 등의 API Gateway 들이 있다.
| Spring Cloud Gateway | Kong | KrakenD | |
| 개발언어 | Java | Nginx, Lua | Go |
| 쿠버네티스 | 가능 | 가능 | 가능 |
| 인증 | 가능 | 가능 | 가능 |
| 로드 밸런싱 | 가능 | 가능 | 가능 |
| 모니터링 및 로깅 | Grafana, Prometheus 등 별도의 3rd-party를 이용해 모니터링 가능 | Grafana, Prometheus 등 별도의 3rd-party를 이용해 모니터링 가능 | Grafana, Prometheus 등 별도의 3rd-party를 이용해 모니터링 가능 |
| Aggergation | Filter를 이용해 구현 가능 | Pre-Plugin과 Lua script 를 이용해 적용 | json script를 이용해 적용 가능 |
| 플러그인 | 지원 | 지원, Lua script로 커스텀 가능 | 지원, Go, Lua script로 커스텀 가능 |
| 특징 | Spring 생태계, 커뮤니티 넓음, Java언어로 구성하므로 Java에 익숙하면 사용 편의성 좋음 | Nginx 기반으로 성능 우수, 플러그인 개발이 어려움(Lua 언어로 개발해야함) | 성능을 위해 제작한 모토에 맞게 빠른 성능 제공, GUI 또는 json scrip를 통한 설정 가능 |
구축 예제
- Spring Cloud Gateway를 이용한 API Gateway 구축
- KrakenD를 이용한 API Gateway 구축
- Nginx를 이용한 API Gateway 구축
1. Spring Cloud Gateway를 이용한 API Gateway 구축

1.1. API Gateway 구축 환경
- Java 17
- Spring Boot v3.1.1
- Spring Cloud v4.0.4
1.2. 의존성 설정(build.gradle)
plugins {
	id 'java'
	id 'org.springframework.boot' version '3.1.1'
	id 'io.spring.dependency-management' version '1.1.4'
}

group = 'com.example'
version = '0.0.1-SNAPSHOT'

java {
	sourceCompatibility = '17'
}

repositories {
	mavenCentral()
}

ext {
	set('springCloudVersion', "2022.0.4") // 2022.0.4 is the latest one.
}

dependencyManagement {
	imports {
		mavenBom "org.springframework.cloud:spring-cloud-dependencies:${springCloudVersion}"
	}
}

dependencies {
	implementation 'org.springframework.boot:spring-boot-starter'
	implementation 'org.springframework.cloud:spring-cloud-starter-gateway'
	implementation 'org.springframework.cloud:spring-cloud-starter-config'
	implementation 'org.springframework.boot:spring-boot-starter-webflux'


	testImplementation 'org.springframework.boot:spring-boot-starter-test'
}

tasks.named('test') {
	useJUnitPlatform()
}
1.3. API Gateway 설정(application.yml)
server:
  port: 8080

spring:
  cloud:
    gateway:
      routes:
        - id: example1
          uri: http://localhost:8001/
          predicates:
            - Path=/example1/**
            - Method=GET,POST


        - id: example2
          uri: http://localhost:8002/
          predicates:
            - Path=/example2/**
            - Method=GET,POST


  config:
    import: "optional:configserver:"
2. KrakenD를 이용한 API Gateway 구축
2.1. KrakenD Designer를 이용해 config 파일(krakend.json) 생성
해당 링크에 접속하여 KrakenD의 원하는 설정을 적용한 후 Download config를 통해 krakend.json 생성
https://designer.krakend.io/#!/
2.2. 생성한 krakend.json 파일을 이용하여 docker에서 실행
docker run -p 8080:8080 -v $PWD:/etc/krakend/ devopsfaith/krakend run --config /etc/krakend/krakend.json
3. Nginx를 이용한 API Gateway 구축

※ API Gateway의 주요 기능은 NGINX 오픈소스(OSS)가 아닌 NGINX Plus에서만 사용할 수 있다.
오픈소스를 이용해 구현하는 nginx는 API Gateway보다 reverse proxy로 볼 수 있다.
3.1. API Gateway 구축 환경
- Docker v24.0.5
- Docker Compose v2.24.6
- nginx v1.25.4
3.2. docker compose 설정(docker-compose.yml)
version: '3'

services:
  nginx:
    image: nginx
    volumes:
      - /etc/docker/nginx/conf.d:/etc/nginx/conf.d:ro
      - /var/log/nginx/error.log:/var/log/nignx/error.log
    ports:
      - "80:80"
    networks:
      - backend
    depends_on:
      - service_8001
      - service_8002

  service_8001:
    container_name: service_8001
    networks:
      - backend
    build:
      context: ./example1
      dockerfile: Dockerfile
    expose:
      - "8001"

  service_8002:
    container_name: service_8002
    networks:
      - backend
    build:
      context: ./example2
      dockerfile: Dockerfile
    expose:
      - "8002"

networks:
  backend:
    name : backend
    driver: bridge
※nginx의 upstream은 ip:port 또는 컨테이너명:port 를 통해 연결이 가능한데, 도커 내부의 네트워크 문제로 연결이 되지 않는 상황을 방지하기 위해 동일한 네트워크로 묶어주는 편이 좋다.
#docker 컨테이너 ip 조회
docker inspect [컨테이너명]
...
 "Networks": {
        "IPAddress": "172.20.0.3",
 }
...
3.3. ngnix 설정(default.conf)
upstream server는 컨테이너명 또는 ip로 설정이 가능함.
upstream service_8001 {
	server service_8001:8001;
}

upstream service_8002 {
	server service_8002:8002;
}

server {
    listen       80;
    listen  [::]:80;
    server_name  localhost;

    #access_log  /var/log/nginx/host.access.log  main;

    location / {
        root   /usr/share/nginx/html;
        index  index.html index.htm;
    }

    location /example1 {
		proxy_pass http://service_8001;
		proxy_set_header Host $host;
	}

	location /example2 {
		proxy_pass http://service_8002;
		proxy_set_header Host $host;
	}

	# redirect server error pages to the static page /50x.html
    error_page   500 502 503 504  /50x.html;
    location = /50x.html {
        root   /usr/share/nginx/html;
    }

	#error_page  404              /404.html;
}
※nginx의 기본 config 파일인 nginx.conf 파일의 구조는 다음과 같다.
events {

}

http {

	upstream {

    }

    server {


    	location {

        }

    }

}
해당 구조를 지키지 않고 config 파일을 실행할 경우
"upstream" directive is not allowed here in /etc/nginx...
라는 에러가 출력될 수 있다. upstream의 디렉티브 위치가 잘못 되었기 때문에 발생하는 에러이다.
그래서 nginx.conf에 설정을 할 경우 디렉티브 구조를 맞춰서 nginx.conf 파일을 수정하거나 http 디렉티브 안에
include /etc/nginx/conf.d/*conf;
구문이 있을 경우 default.conf를 수정하는게 편하다.
3.4. docker compose를 이용한 nginx 컨테이너 실행
docker compose -f docker-compose.yml up -d
'DevOps' 카테고리의 다른 글
| [Kafka] 카프카 명령어 모음(웬만한 건 다 있음) (0) | 2024.10.07 |
|---|---|
| [Kubenetes] 쿠버네티스 완전 삭제 방법 (0) | 2024.02.22 |
| [Kubernetes] Ubuntu 리눅스 쿠버네티스 클러스터 구축 방법 (0) | 2024.02.14 |
| [Redis] 레디스 주요 명령어 모음 (0) | 2023.07.05 |
| [Linux] EC2 Ubuntu 리눅스 Docker 설치 방법 및 도커 주요 명령어 (0) | 2023.07.05 |

